Oasis montaj Menus
- Copy Space for Confluence
- Maki Rider (Unlicensed)
Oasis montaj Menu Files
An Oasis montaj menu file (.omn) and sub-menu file (.smn) define menus that can be added the Oasis montaj menu bar. Menus organise GXs, Python scripts, .NET assemblies and internal commands into logical processing groups and workflows to be presented to your user. You will generally create a menu specifically for your own application suite, and your user will load your menu by clicking the Load menu option on the GX menu. The contents of your menu will be inserted into the displayed Oasis montaj menus. See How menus are loaded for details of how menus are found and loaded.
Only menus with extension .omn will be displayed in the menu browse tool. Menu files with extension .smn are sub-menus, and these can be included in other menus. A menu may load submenus using the LOADMENU directive followed by the sub-menu name.
For example, following is part of the menu definition file for the gravity reduction system (gravity.omn):
/
/ Gravity Reduction System
/------------------------------------------------------------------------------

MENU "&Gravity"
ITEM "Pro&ject Information..."    	 ,grproj.gx
ITEM "&Processing Parameters..."     ,grparm.gx
SEPARATOR
SUBMENU "&Base Stations"
SUBMENU "&Calibration"
SUBMENU "&Locations"
SEPARATOR
SUBMENU "&Import"
ITEM "&Drift Correction..."          ,grdrift.gx
ITEM "&Merge with Master Database...",grappend.gx
SEPARATOR
ITEM "Process &Repeats..."           ,grrepeat.gx
SUBMENU "&Terrain Corrections"
SEPARATOR
ITEM "&Free Air, Bouguer Anomaly..." ,grboug.gx
SUBMENU "Free air, Bouguer Step by Step..."
SEPARATOR
ITEM "Edit File..."                  ,edit.gx
ITEM "Sort All by &1 Channel..."     ,sortall.gx
ITEM "Sort All by &2 Channels..."    ,sortall2.gx
ITEM "Channel &Math..."              ,geogxnet.dll(Geosoft.GX.MathExpressionBuilder.MathExpressionBuilder;RunChannel)

MENU "&Gravity/&Import"
ITEM "&Import Gravity Survey..."     ,grload.gx
SEPARATOR
ITEM "&Edit Data File..."            ,edit.gx
ITEM "&Download From CG3..."         ,grdnlcg3.gx
Menu Keywords
Each line of a menu file is either a comment, a blank line, or a keyword followed by parameters. The following table describes each of the supported keywords:
Keyword | Parameters | Description |
|---|---|---|
CLEARALL | None | The CLEARALL keyword will clear all menus; excluding the coremenus.omn This enables your menu to completely control the Oasis montaj environment for your specific application. The CLEARALL keyword, if used, should be the first keyword in your menu file. If you use this keyword, you should provide your user with access the *ID_CLEARMENU internal command somewhere in your menu system. This command will allow your user to reset the menus to the Geosoft coremenus.omn. |
MENU | Name | This identifies a new menu, which can appear on the Oasis montaj menu bar, or may be a submenu that will become part of a previously defined menu. Each MENU line is followed by one or more ITEM lines, SUBMENU lines or SEPARATOR lines. You can also specify the name of a pop-up menu that is activated when the right-mouse button is pressed. Pop-up menus are context sensitive, which means that the menu that appears depends on the current mode and the object that is under the mouse cursor at the time the right-mouse button is pressed. |
SUBMENU | Name | This identifies a menu entry that will be a sub-menu in the menu list. There must be a MENU associated with the submenu later in the OMN file, and the name in the MENU must be “menu_name/sub_menu_name”. See the above example. Submenus may also be nested. |
SEPARATOR | None | Places a separator to space items in the menu list when displayed. |
LOADMENU | File | Load another menu file. If you need to share certain menu components among applications, it is easier to store the menus in a separate menu file that can be included in other menu files. If a menu file is never intended to be used by itself, you should give it extension “.smn” to prevent the file from appearing in the load menu browse tool. All menu files are located in the <geosoft>\omn directory by default. Menus that are not located in this directory must be specified explicitly (see File Names below). |
LOCATE | TOP | Controls the location of the menu items that follow. The AFTER and BEFORE require the name of a menu item that already exists in the menu. |
ITEM | Name, Action | An ITEM in a menu identifies an action that will happen when your user selects the item. Name is the text that appears in the menu. An "&" placed in front of a letter indicates the keyboard shortcut key (alt-key). Action is the name of a GX, a GS script, a Python script, a Win-32 help file, a DLL or the name of an internal command. Refer to the detailed ITEM documentation below for more information. Internal commands must be one of the commands listed in the Internal Command table below. <image.bmp[i]> is the name (and optional image index) of an icon image to display next to the item. {?context} is a conditional context test that if not true will shade the item Name in the menu. See Controlling Item Activation. |
Pop-Up Menus
A pop-up menu is a context sensitive menu that appears when the right mouse button is pressed. The menu that is displayed (popped-up) depends on what has been selected, where the mouse is located and/or the current mode of Oasis montaj. The default oasis pop-up menus are defined in the file montaj_popups.smn in the Geosoft directory. The following table lists some of the available pop-up menus:
Popup Name | Context |
|---|---|
@PopupSelLine | Line/group |
@PopupSelChanNone | Empty channel |
@PopupSelChan | Loaded channel |
@PopupSelData | One or more date items selected in a channel/line |
@PopupSelBDat | Data from all lines on this channel |
@PopupSelProf | Cursor in a profile window |
@PopupSelFid | Fid is selected |
@PopupMap | Map with nothing selected |
@PopupSelGroup | Group selected and in context |
@PopupSelView | View selected and in context |
@PopupSelItem | Group edited and item selected |
@PopupSelGrid | AGG group selected |
@PopupGroupEdit | Group opened for edit, nothing selected |
@PopupMapGroup | Map in group select mode, no group selected |
@PopupMapView | Map in view select mode, no view selected |
@PopupSelCSymb | Colour symbol group selected |
@PopupBoxMark | Group edited, multiple items selected |
@PopupSelPAGG | Poly-aggregate (animation) selected |
Displaying images for items in menus
Menu items can display images (icons really) to stress what an item does or represents. Icons must be 18 x 18 in size (pixels) and can be stored individually or contained in a larger bitmap file and indexed by the image number in square brackets []. For example, if my bitmap file contains six 18 x 18 images and the item requires the 4th image in the file you would use <image.bmp[3]> to reference that position (index count begins at 0). Image files are .bmp files and are usually stored in the img subdirectory of Oasis montaj.
Examples:
ITEM "Run &GX...", gxrun.gx <standard.bmp[13]>
ITEM "&Load menu...", *ID_VIEW_LOADMENU <standard.bmp[14]>
ITEM Action in Menus
The ITEM keyword in a menu or sub-menu defines an action to be taken when selected. The type of action depends on the action type, which is determined by the action extension. The following action extensions are:
| File type | Description |
|---|---|
| .gx | run this GX, from .../user/gx or .../gx/ folder Example:
Only displayed if a current map is open, and runs |
| .gs | run this script from the .../user/gs or .../gx/ folder |
| .py | run this Python script from the .../user/py or the .../py/ folder |
| .dll(assemblyname.gxname;method) | run this DLL from the .../user/bin/ or the .../bin/ folder assemblyname.gxname is the name of the assembly in the DLL, and method is the method name from that assemby to execute. Example:
Will execute the "Run" method found in the "AddBingLayerToMap" class of the Geosoft.EIMS.GX assembly that can be found in |
| internal_command | Menu items can also activate an internal command, which can be named in an ITEM. Note that internal commands are not stored in a script or in the processing log file. Only GX commands and GX parameters appear in a script of a log file. If scripting is required, most commands can be emulated by writing a GX that performs the required action. |
| SHELL() | The SHELL action identifies an operating system command to be executed and uses the syntax of the Windows "ShellExecute" API as follows:
The Windows "ShellExecute" command is called with the specified parameters. Please refer to your Windows API documentation for the use of these parameters. Items in square brackets are optional and are for special use when full control of the Windows functions are required. The WinHelp verb launches Windows Help. ShowCmd and nCmd are both integer values that can be set to the Windows manifest constant values as required. By default, ShowCmd will be 1 (SW_SHOWNORMAL), and nCmd will be 258 (HELP_COMMAND). The following are some examples show how to use the SHELL command: ITEM "&Geosoft Website",SHELL(open;http://www.geosoft.com) ITEM "&Geosoft Website",SHELL(open;http://www.geosoft.com) ITEM "&Send a message",SHELL(open;"mailto:geonet@lists.geosoft.com") ITEM "&Subscribe",SHELL(open; "mailto:majordomo@lists.geosoft.com?subject=Subscribe%20to%20GEONET%20user%20help%20list.?body=SUBSCRIBE%20gxnet") ITEM "Ho&w to get help...",SHELL(WinHelp; "JumpID(\"oe32.hlp\",\"ID_HELP_TECH_SUPPORT_TOPIC\")") |
How menus are loaded
The minimum Oasis montaj menu includes a File menu, a Window menu and a Help menu. When you create a new project, Oasis montaj first loads the menu(s) specified by the CORE_MENUS entry in the settings.gx, which my default are coremenus.omn. When an existing project is opened, the same actions are executed and then any menus that were open when the project was last closed are also displayed.
If the user clears menus, all menus are removed except the coremenus.omn file. If a project is closed, the menus return to minimum state.
If you want your application to completely control your users menu, you can change global variable SETTINGS.CORE_MENU to point to your menu. You may look at the contents of montaj.smn and montaj_popups to see if there are any components of these menus that you want to include in your application.
Menus can also be loaded by selecting "Settings / Manage menus..." option, which presents a dialog that allows you to turn various menus on and off:
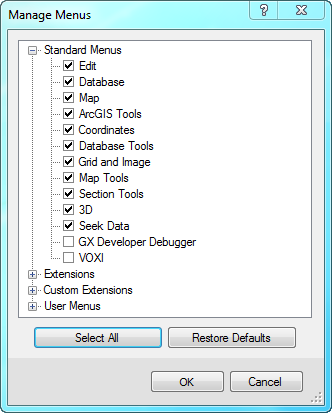
The "Standard Menus", "Extensions" and "Custom Extensions" are menus found in the .../omn/ folder.
The "User Menus" are menus found in the .../user/omn folder.
Finding Files
Resource files (including menus, GXs, etc.) are organized under the "Geosoft Desktop" folder in your "Program Files". See Geosoft Desktop - Installation Folder Organization for more detailed information.
By default resource files will be found in the appropriate folder, and if not found there Oasis montaj will search the .../user/ folder. For example, if searching for "my_procedure.gx", Oasis montaj will first look for .../gx/my_procedure.gx, and if not found there it will search .../user/gx/my_procedure.gx.
Files can also be loaded explicitly by specifying the full path, or by specifying an explicit location that is defined in the Geosoft/Core/Environment settings of the SOFTWARE section of the registry.
| Registry Label | Default Location |
|---|---|
| <geosoft> | the main Geosoft installation directory. |
| <geosoft2> | the secondary Geosoft installation directory (normally user). |
| <geotemp> | the Geosoft temporary file directory. |
| <other> | other registry/environment variables. The “Geosoft/Core/Environment” registry is searched first. If the name indicated by “other” is not found, the user’s environment is searched. |
For example, if you install your custom system, including GXs, in the user\my_system directory, you can identify the GX in your OMN file as follows:
ITEM,”Run one of my GX’s”,<geosoft>\user\my_system\my_procedure.gx
or
ITEM,”Run one of my GX’s”,<geosoft2>\my_system\my_procedure.gx
Controlling Item Activation
Some items should only be active if the project has a database or a map open. You can specify the item dependency by placing one of the following qualifiers at the end of an ITEM line in either a menu. The menu item will be greyed out if the dependency is not true:
{?map}
{?gdb}
{?map_or_gdb}
{?map_and_gdb}
{?packed_map}